WHY COILOVERS ARE REALLY GOOD:
-You can lower or raise ride height as needed.
-You can easily adjust corner weights (the cars weight distribution)to improve grip.
-You can dissasemble/assemble the suspension without spring compressors. It's possible to change all springs on the car, in a parking lot, in 25 minutes.
-You can use any rate spring you want.
WHY THEY'RE NOT SO GOOD:
-If helper springs are'nt used, the springs can be noisy in extreme circumstances.
-Solid upper mounts (if used) make for a rough ride on the street.
YOUR OPTIONS:
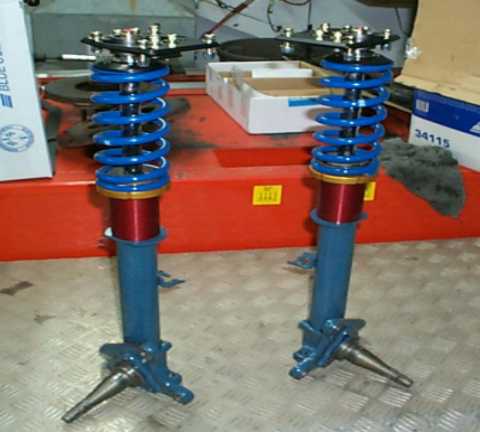
Front-Ground Control offers setups with or without camber/caster plates. Without camber plates the kit is $199. This is a simple, swap-in, idiot-proof kit to install, and doesn't require welding. It includes an aluminum threaded sleeve, adjustable perch, springs and an aluminum top hat. You can use the stock lower spring perch or cut the perch off and weld on a new lower perch weldment (optional) to keep it strong, light, and open up some space for adjusting and wider tires.
The camber plates add $265 to the kit and use a new torrington bearing, and a solid spherical upper mount that replaces the flimsy rubber bushing. The upper "pillowball" mount substantially increases steering response but makes the ride a bit more harsh since shock jolts are transmitted directly to the chassis. Camber plates require cutting some material from the strut tower. Certain shocks (Tokico Illuminas) may need to be sent to Ground Control so they can turn down the shafts to fit through the camber plates. They will usually do this for no charge. Australian company K-MAC also makes camber plates that bolt in and utilize the stock-sized springs, but they are $345.
Rear- Any coilover kit you install in the stock position of the rear spring will be a "race-only kit not recommended for street use". This is because coilovers are adjustable and the springs they use don't have the extra free length to keep the spring from coming out when the suspension is unloaded.
 There are a few ways to keep this from happening. A:Run a cable from the frame to the control arm through the spring. B:Install nylon suspension limiter strap like the off-road racing trucks use(availible from Deist) to limit travel of the control arm. C:Raise the shock rod up through the rear shock mount by turning down the rod and re-threading so the shock limits suspension travel. This is actually the best route, since lowering the car can bottom out the rear shocks internally (Tokico Illuminas can bottom out at over 1.75" drop). Whichever route you take, you should consider making this step adjustable to compensate with ride height changes.
The GC kit is $219, and includes a steel threaded mount, adjustable perch, and springs. If a company tries to sell you an aluminum threaded mount back here, forget it. The suspension movement will obliterate it in no time.
There are rumors of strut mounted rear coilovers out there using a 240sx strut that "bolts in" in the same location as the shocks (JIC?). Keep in mind that the weight of the z wasn't designed to be supported here. You will need to brace the frame up top with a roll cage or similar modification. There is little point to putting coilovers in a location where the frame will be moving around. You also have the added cost of buying the new 240sx strut.
INSTALLATION
Front- Installation of GC coilover kit with weld-on perch and camber/caster plates.
Start by using the proper procedures to remove the strut assembly from the car. Remove the spring and upper mount with a spring compressor. Remove the shock cartridge by loosening the gland nut with a big pair of pliers. Use a hacksaw to remove the lower spring perch by cutting around the bottom just above the weld.
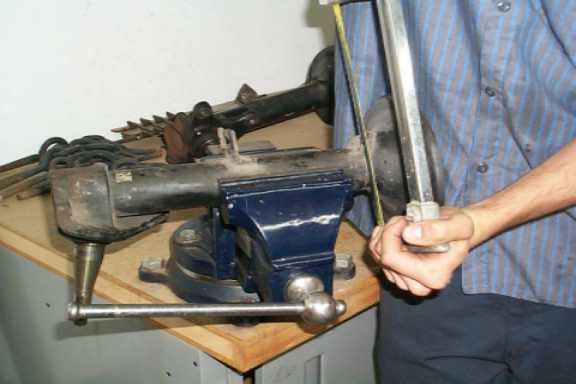
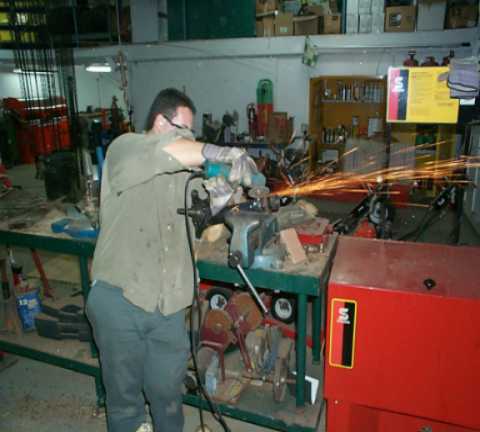
Grind the rest of it off flush with the housing.
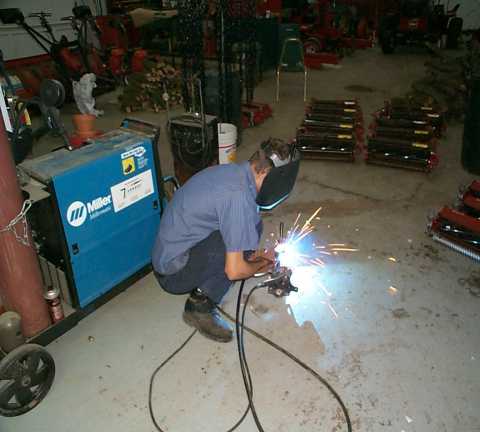
Clean out the strut housing. Now place the lower perch weldment on the housing, followed by the threaded sleeve, and screw the gland nut on all the way. Unscrew the gland nut 1/8th of a turn. Next, position the weldment with the flat side towards the spindle. Square it up with the sleeve and tack weld it in place. Now you can remove the gland nut and sleeve and finish welding it on all around the housing.
Apply appropriate finish to the strut housing with the proper smurf blue paint.

Now add some automatic transmission fluid to the housing to help cool the shock and install the shock cartridge. Install your sleeve/perch again with the perch right side up and tighten the gland nut. The nut should tighten down the sleeve as well as the shock cartridge. If you pull up and down on the shock shaft and feel it moving inside the housing, you can shim it by placing a rubber o-ring under the nut to keep things tight. Now the new spring goes on followed by the top hat. Grease the torrington bearing in the top hat and coat the top of the thrust bearing with dry graphite lube. Get the right camber/caster plate for the side of the car you are working on and install it on the shaft. Secure it with the special spacer and nut. Now the strut assembly is finished, the spring will look loose now, that is OK.
Next, use the template supplied by GC to see where to remove sections of the strut tower and where to drill the 5 new holes. Be sure the template is oriented correctly for the side that you are working on. Test for fit and clearance during adjustments with a loose camber plate, keeping in mind that it goes UNDER the strut tower. Now you can install your strut assembly and bolt everything else back on.
Rear- Begin by removing the rear springs using the proper procedure. Discard the upper rubber insulators. Remove the lower insulators. Use a cutting tool to remove a small section from the egg-shaped control arm so the smaller 2.5" diameter spring can fit on it.
Modify the lower rubber insulator in the same manner.
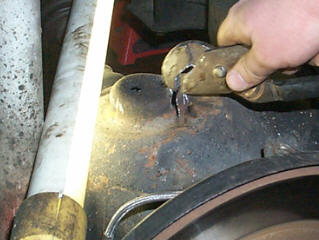
Now get yourself 4 feet of cable, 8 cable clamps, 4 eyebolts, and some self-locking nuts for the eyebolts. If you look up at the upper spring perch, you will see a hole. Jam an eyebolt in there and it will pop through a sticker. To access the top of this hole and put the nut on the eyebolt, you will need to remove the side interior panel inside the car. Now install an eyebolt in the existing hole in the control arm. Take about 1.5 feet of cable and make a loop through the top eyebolt securing it with 2 clamps.
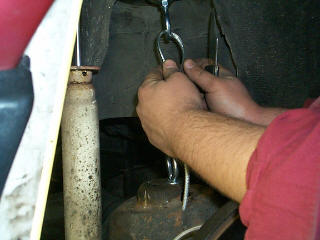
Put the coilover assemblies in. Lower the car and adjust your approximate ride height. Jack up the car again and use a jack to push the control arm up to the limp spring. Use some needlenose pliers to make the loop for the lower eyebolt. Clamp that sucker, making sure the cable is taught. Remove the jack and push down on the control arm a bit with your hand to make sure everything is secure. If you have noise issues you can weld the steel mount to the frame.
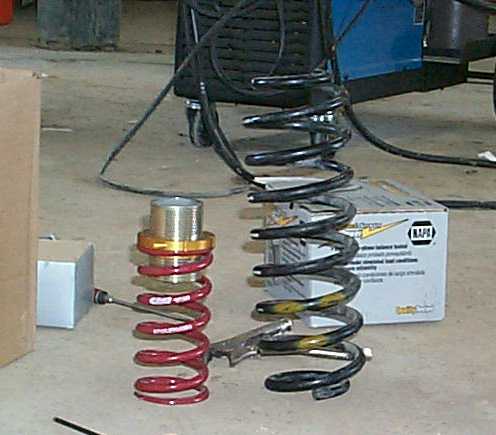
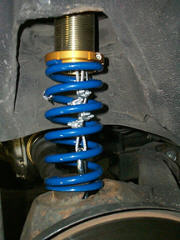
When you're done it should look like this.
SETTING CORNERWEIGHTS:
This step is optional, but provides the optimum handling for the car by making sure all 4 tires are doing equal share of the work. Weigh the car at all 4 corners after jettisoning unnecessary items for racing, disconnect the sway bar end links, and with you sitting in the car.
1.Add all weights together to find the total weight of the car.
2.Figure the percentage of weight front to rear:
Front %= Total weight on both front tires divided by the total weight of the car X 100.
Rear %= Total weight on both rear tires divided by the total weight of the car X 100.
These should add up to 100% of course.
3.Now you can figure the ideal weight for each wheel:
LF ideal weight= % on front tires X total weight on both left tires, divide by 100.
RF ideal weight= % on front tires X total weight on both right tires, divide by 100.
LR ideal weight= % on rear tires X total weight on both left tires, divide by 100.
RR ideal weight= % on rear tires X total weight on both right tires, divide by 100.
4.Now compare this to your actual readings and adjust accordingly. Note that they should all be off an equal amount. You may not want to bother with a 10 pound difference, but 50 pounds is excessive and should be adjusted. Do this by raising/lowering ride height at the proper corner. Adjusting the corner weight at one corner of the car effects the weights at ALL FOUR TIRES. Weigh the car again and check your work.
5.Reconnect your sway bars. When you do, if the endlinks don't contact equally on both left and right sides of the car, you will need to shim an endlink with washer(s). An unbalanced sway bar will throw off cornerweights.
This all sounds quite complicated, but once everything is in front of you it will seem pretty straightforward. If you have any questions/comments, let me know. Good luck. -Butter
